
This is the second blog in a series of three to help you save time when working in Excel:
- Save time with the best Excel shortcuts
- Save time with the Quick Access Toolbar (this blog)
- Complete Excel tasks in a second
What is the Quick Access Toolbar?
This is a narrow toolbar of small task icons which by default appears above the Excel ribbon and looks something like this.
![]()
These toolbar icons are always visible and so give you quick access to common tools - you don’t have to search through the detailed ribbons to find what you are after.
And the great news is, you can customise it yourself to contain tools which you regularly use, ready for quick access… hence the name: Quick Access Toolbar (QAT). These are then lined up ready to use and always visible - no mouse clicks needed to show them!
Where is it?
By default it sits above the menu and ribbons at the top of the Excel screen and contains just a few items like New, Open and Save.
I recommend that you use the option “Show Below the Ribbon” to reduce the amount you must move the mouse and to create more space for icons. Simply click on the down arrow at the far-right end of the QAT ![]() and from the long list select
and from the long list select ![]() at the end.
at the end.
How can I use it?
Use it exactly the same as the standard Excel ribbons. Click on an icon to carry out that command.
How can I customise it?
Start by clicking on the down arrow at the far-right end of the QAT and then you get a list of commonly-used tasks such as new, open, and save.
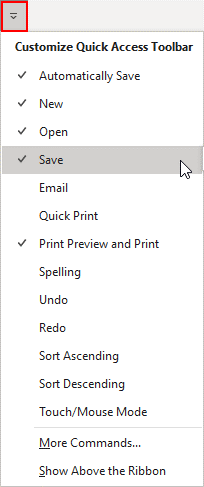
Those items in your QAT have a tick mark next to them. Simply click on relevant items to add them to or remove them from your QAT, as you see fit.
At the end of this list you will see the option “More commands”. Click on this to go into the detailed customisation and don't be shocked by what you see - it looks a bit complicated but is quite easy to use! I will show you how.
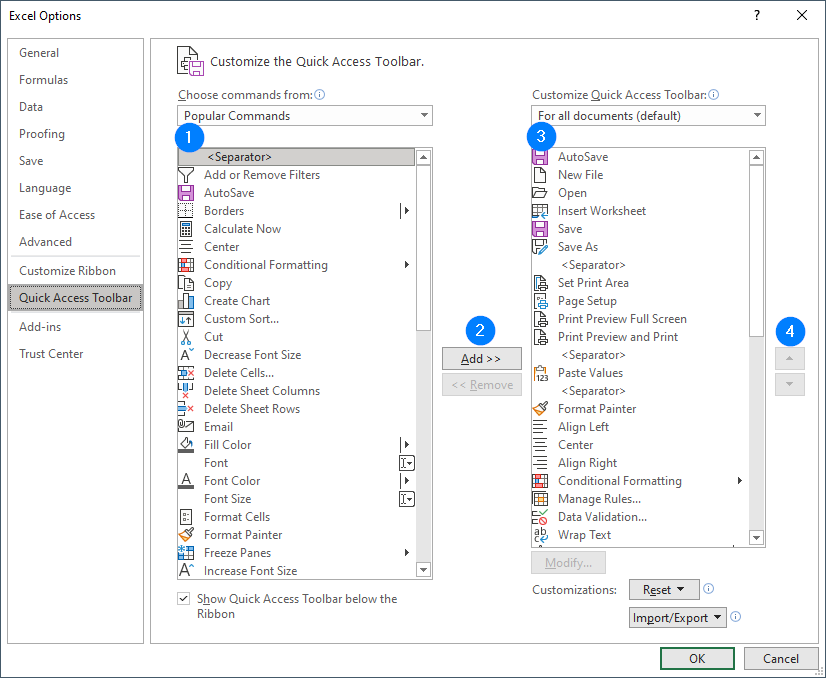
“Customise the Quick Access Toolbar” has four main sections, numbered in the screenshot above.
- Available commands: On the left you can select the commands that you want to add to your QAT. Find a command you want, click on it to select it. You can also select <separator> (first item in the list) which is a thin vertical line to optically separate sections of your QAT.
- Add/remove: Click the “Add >>” button to add the selected come and to your QAT on the right. The new items will be added below the QAT command that is currently selected in section 3.
- QAT: Here you can see the list of commands on your QAT. To remove a command, click on it to select it, then use the "<< Remove" button (in section 2, below the "Add >>" button).
- Up and down: To move a command in the QAT list, click on it to select it, then use the up and down arrow buttons to move it to your desired location.
When you are finished click OK to accept all the changes made.
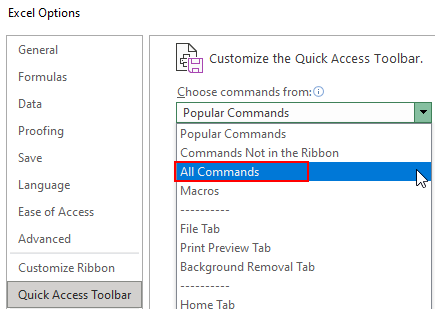
How can I find a specific command?
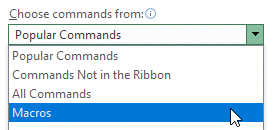
Everything in the ribbons and more(!) is available here. By default, the list shown in section one on the left contains only popular commands. Click on the down arrow to select other options for example “All Commands”.
![]() how2excel tips
how2excel tips
Quickly add and remove QAT items:
To add: Simply right-click on an icon in an Excel ribbon and select "Add to Quick Access Toolbar". It will be added at the end. To change the position, you need to us the more detailed customisation dialogue explained above, and the up and down arrows on the right.
To remove: Simply right-click on an icon in the QAT and select "Remove from Quick Access Toolbar".
Alternatively you can find and note down the names of the commands you want to add and then add these, as follows.
Find the name of a command: Commands are not always named the way you would expect. To find the name of the command which you are looking for, go back into normal Excel, find the command in the ribbon and hover over it. A tooltip appears, starting with the official name of the command - this is the name you need to search for in “Customise the Quick Access Toolbar”.
Find the command in the list: To avoid lots of scrolling, simply click somewhere in the list of command and type a letter e.g. D to jump to the first item starting with that letter.
Add macros: To add a macro to the QAT, first select macros from the drop-down list in section 1.
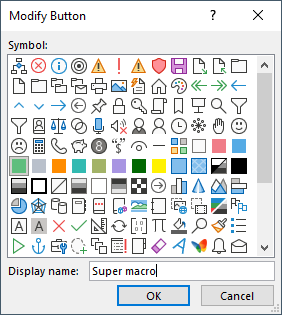
Then select and add your (macro) command as usual. Note that macros stored in your personal workbook start with the name personal. It makes sense to customise the appearance of macro items in the QAT. To do that, select the relevant (macro) command in the QAT (section 3), then click on the modify button at the bottom.
![]()
You can then select an appropriate icon and change the name which will be displayed when you hover over the icon in your QAT.
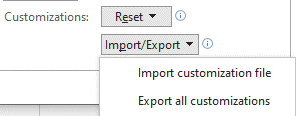
Export and import your customisations: After you have painstakingly customised your QAT, you may wish to make a back-up or give a copy to a colleague. Simply use the import/export button at the bottom on the right to export or import, as appropriate.
And action!
It can take a little while to get your QAT set up exactly the way you want it, but the investment of your time is well worth it. You then have very quick access to the commands and macros that you use a lot and this can speed up your work as you save you lots of time searching for items in the standard Excel ribbon.