
Create range names

Select a cell or range of cells, then type in a short but descriptive range name in the Name Box (above cell A1, next to the Formula Bar) e.g., Start_date or Tax_rate. The name may not contain spaces (use an underscore if necessary) and certain names are not allowed e.g. J5 as this looks like a cell reference.
Use your range names
Here are three practical uses.
- Simplify formulas

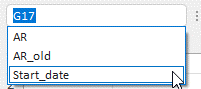
Simply start typing your range name in your formula and it will appear in the list along with function names (see screenshot above). Alternatively, press F3 to get a list to select from. This can make your formulas easier to read. In the example shown, a payment date cannot be in the past i.e. before the start date of the tool.
Karen Roem also likes the fact that the name does not change when you copy the formula, in contrast to a 'normal' link to a cell which you have to fix with dollar signs.
- Easily select a range to copy

Here I have defined a range called AR which covers all the entries in the AR report. I can select this named range using the Name Box (above cell A1, next to the Formula Bar). I can then copy this (manually or using a macro) e.g. to another range AR_old, to allow comparisons to be made.
- Aid navigation
(i) Use the Name Box
Simply use the Name Box dropdown (above cell A1, next to the Formula Bar) and select a range name to jump to it.
(ii) Create a hyperlink

Alternatively, create a hyperlink using Insert, Link, Insert Link… (at the end of the list), Place in This Document, select a range name (under “defined names”) --> a clickable hyperlink is created in the cell. Simply click on it to jump to the range!
Bonus tip: You can copy this hyperlink to other places in your workbook if desired.
Edit and manage your range names

If you need to review or amend your ranges, simply use the Name Manager on the Formulas ribbon.